-The Reyes Rendering Architecture-
Part one.
This article aims to take you through the basic architecture of the Reyes algorithm. I'm not going to describe every tiny step but I will detail the major portions and offer pseudo code where appropriate. Also included is the source code for a simple Reyes renderer in various stages of completion.
A big thank you goes to Dave Myers for his proof reading skills and suggestions.
Rendering algorithms have been a hobby of mine for almost ten years now. I wrote my first ray tracer in 1999 and I've been hooked ever since. After hacking my way through path tracing, photon mapping, radiosity, and metropolis light transport, I started looking for a change of pace. Ray tracing is so simple and straight forward; Once you understand the basics, everything else falls into place. This is great for beginners but for repeat rendering offenders like myself, something a bit more challenging is always welcome.
Enter micropolygon renderers. The basic concept behind micropolygon renderers such as Reyes is to divide each surface into tiny, pixel sized polygons and to project them onto the screen. Micropolygon renderers are quite fast and offer a number of interesting features such as displacement mapping. They're able to handle parametric surfaces very efficiently and there's no need to worry about complicated spatial subdivision structures. Rendering a displaced NURBS surface in a raytracer ain't easy. It's trivial in a Reyes renderer.
A Reyes renderer can be divided into five basic steps. In order they are:
- Bound
- Split
- Dice
- Shade
- Sample
A primitive is bound by the screen and the near and far clipping planes. It is then split into smaller primitives. Each smaller primitive is then diced into a grid of micropolygons. The micropolygons are then shaded. Finally, the micropolygons are projected onto the screen and sampled. We'll be covering the bounding, splitting, and dicing stages in this chapter.
Bounding
Bounding involves estimating how large a piece of geometry is when projected onto the screen. There are numerous way to do this. The simplest way is to coarsely dice each piece of geometry and project the resulting vertices onto the screen. Some primitives such as Bezier patches are bounded by their control points, meaning that projecting the control points onto the screen will give you a solid estimate of the object's size. For other objects, a 3d bounding box can be constructed around them and projected on the the screen. Care must be taken to ensure that the screen space estimate accounts for the possibility that the geometry is displaced.
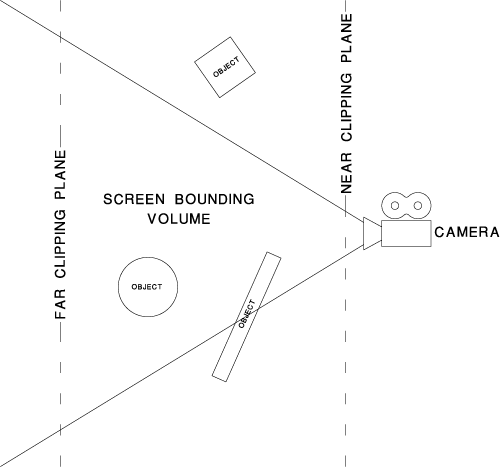
There are advantages to each method. Coarse dicing is the slowest as it requires repeatedly dicing the primitive and possibly running displacement shaders but it's also the most general.
A simple screen space bounding function might look like this:
void Bound(Primitive *shape, BoundingBox *bbox, Microgrid *grid)
{
   //Coarsely dice the primitive
   dice(shape, grid, 8, 8);

   //Project the vertices of the micropolygons onto the screen
   project_microgrid(grid);

   //Find the minimum and maximum values of the vertices
   for(int x = 0; x < 8; x++)
   {
      for(int y = 0; y < 8; y++)
      {
         bbox->min.x = min(bbox->min.x, grid.vertex(u,v).x);
         bbox->min.y = min(bbox->min.y, grid.vertex(u,v).y);
         bbox->min.z = min(bbox->min.z, grid.vertex(u,v).z);

         bbox->max.x = max(bbox->max.x, grid.vertex(u,v).x);
         bbox->max.y = max(bbox->max.y, grid.vertex(u,v).y);
         bbox->max.z = max(bbox->max.z, grid.vertex(u,v).z);
      }
   }
}
Checking to see if the primitive's bounding box is on screen is trivial:
bool OnScreen(bounding_box *bbox)
{
   if(bbox->max.x < 0 || bbox->min.x > screen_width)
      return false;

   if(bbox->max.y < 0 || bbox->min.y > screen_height)
      return false;

   if(bbox->max.z < near_clip_plane || bbox->min.z > far_clip_plane)
      return false;

   return true;
}
Splitting
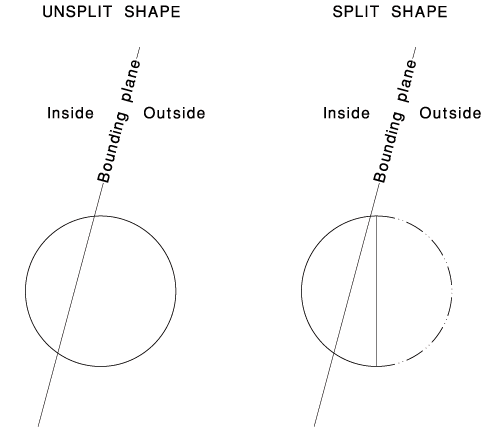
Splitting a shape serves two purposes. First, it allows a more granular level of bounding to be done. If an object straddles a bouding plane, splitting it will allow the sections outside to be discarded.
Second, splitting ensures that there is a good balance between the number of primitives in memory and the number of micropolygons needed to represent them. Primitives that haven't been split enough will result in microgrids that contain tens or hundreds of thousands of micropolygons. On the other hand, it's possible to split a primitive too much, requiring millions of tiny primitives to be stored in memory.
The following code determines if a primitive is larger the splitting threshold by dicing it and projecting the vertices of the microgrid onto the screen. It also deterimes which axis the primitive should be split along.
bool Splittable(Primitive *current_object,
                SplitDirection &direction)
{
   Microgrid grid;

   dice(current_object, &grid, 8, 8);

   float max_u=0, max_v=0;

   for(int u=0; u < 7; u++)
   {
      for(int v=0; v < 7; v++)
      {
         p3d v1 = GetVertex(u,v);
         p3d v2 = GetVertex(u+1,v);
         p3d v3 = GetVertex(u,v+1);

         v1.z = v2.z = v3.z = 0;

         float u_length = distance(v1,v2);
         float v_length = distance(v1,v3);

         max_u = max(max_u, u_length);
         max_v = max(max_v, v_length);
      }
   }


   if(max(max_u*8, max_v*8) > splitting_threshold)
   {
      if(max_u > max_v)
         direction = USplit;
      else
         direction = VSplit;

      return true;
   }

   return false;
}
It's important to choose the splitting direction properly so that the primitive is always being split across the longest axis. Choosing the right splitting direction can substantially reduce the number of primitives that need to be stored in memory. The following graph illustrates two possible splitting directions for a primitive of roughly 6 by 3 pixels with a splitting threshold of 4 pixels.
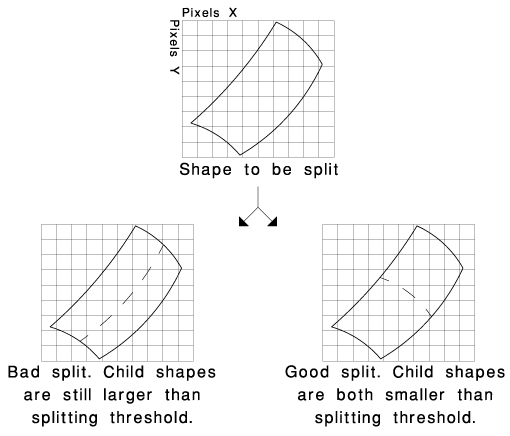
There is no hard and fast splitting threshold; the number can be anything you want. I've found that values between 16 and 32 pixels result in a fairly good mix between the number of primitives and the number of micropolygons.
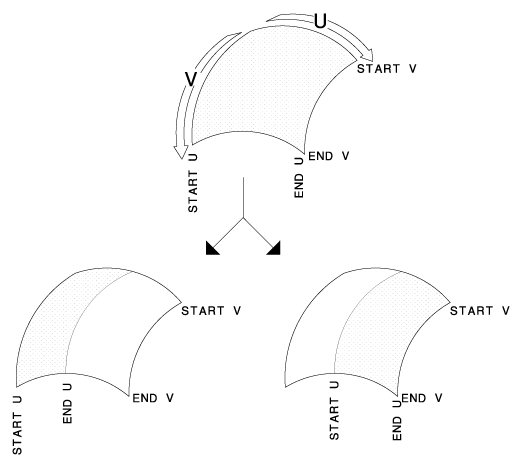
Splitting parametric surfaces is easy. Rather than constructing two new objects complete with new control points (which can be computationally expensive, as in the case of NURBS), it's simpler to define "start" and "end" values on the larger object.
void Split(Primitive *current_object,
             Primitive *child_1,
             Primitive *child_2,
             SplitDirection split_direction)
{
   child_1->control_points = current_object->control_points;
   child_2->control_points = current_object->control_points;

   if(split_direction == VSplit)
   {
      child_1->start_v = current_object->start_v;

      child_1->end_v = current_object->start_v +
            (current_object->end_v-current_object->start_v) / 2;

      child_2->start_v = child_1->end_v;
      child_2->end_v = current_object->end_v;

      child_1->start_u = child_2->start_u = current_object->start_u;
      child_1->end_u = child_2->end_u = current_object->end_u;
   }
   else
   {
      child_1->start_u = current_object->start_u;

      child_1->end_u = current_object->start_u +
            (current_object->end_u - current_object->start_u) / 2;

      child_2->start_u = child_1->end_u;
      child_2->end_u = current_object->end_u;

      child_1->start_v = child_2->start_v  = current_object->start_v;
      child_1->end_v = child_2->end_v = current_object->end_v;
   }
}
This single splitting function can be reused for every type of parametric surface. Some primitives like triangles and polygons require slightly more involved splitting functions. Triangles are particularly inefficient because they must be divided into three quadrilaterals.
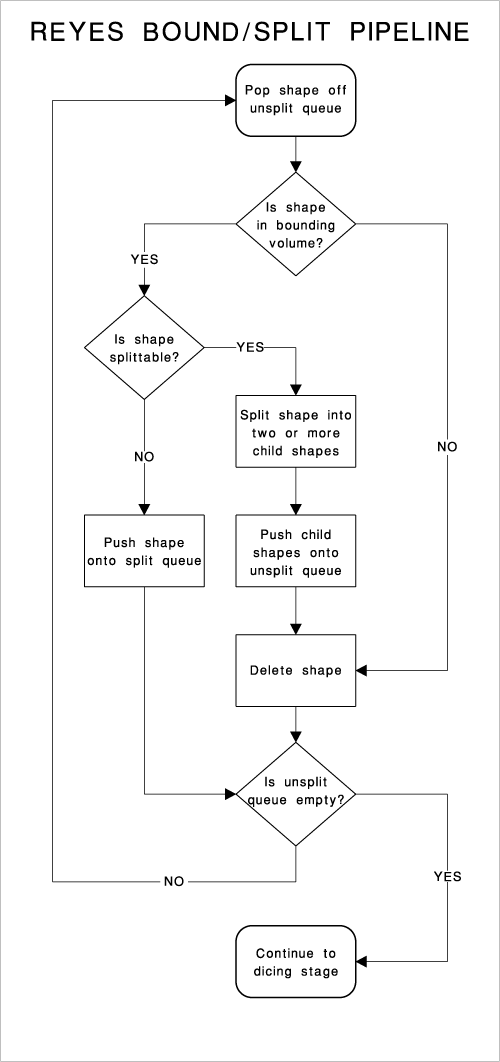
Once a primitive has been split, its children are sent back to the bounding stage and the original primitive is deleted. From a conceptual standpoint, the relationship between the bounding and splitting stages is probably the most difficult part of Reyes to understand. This flowchart should hopefully make it a little more clear:
Dicing
When a primitive is smaller than the splitting threshold, it is diced into micropolygons. Micropolygons are stored in a grid structure called a microgrid. Due to the bounding and splitting phase, each primitive in the scene is now only a few pixels across.
The microgrid is simply a 2d array containing the position, normal, colour, and opacity associated with each vertex in each micropolygon.
class MicrogridVertex
{
public:
   p3d location;
   p3d normal;
   Colour colour;
   float opacity;
};

class Microgrid
{
private:
   int width, height;
   MicrogridVertex *data;

public:


   bool Allocate(int w, int h)
   {
      if(w == 0 || h == 0)
         return false;

      data = new MicrogridVertex[w*h];

      if(data == NULL)
         return false;

      width = w;
      height = h;

      return true;
   }
};
Because each primitive is so small, the size of each microgrid will never be larger than a thousand micropolygons or so.
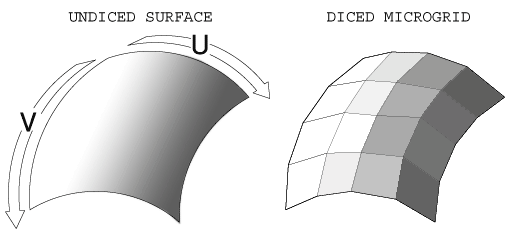
Dicing involves looping over the area of the surface defined by its start and end values and calling the primitive's evaluation functions. The dicing function looks like this:
void Dice(Microgrid *grid, short size_u, short size_v)
{
   grid.Allocate(size_u, size_v);

   for(int u = 0; u < size_u; u++)
   {
      float eval_u = (start_u +
            ((end_u - start_u) * float(u)) /
            float(size_u-1));

      for(int vv = 0; vv < size_v; vv++)
      {
         float eval_v = (surface_data.start_v +
            ((end_v - start_v) * float(vv)) /
            float(size_v-1));

         p3d P = EvalP(eval_u, eval_v);
         p3d N = EvalN(eval_u, eval_v);

         grid->SetVertex(u, v, P);
         grid->SetNormal(u, v, N));
      }
   }
}
Like the splitting function, this can be reused for each type of primitive your renderer supports. Every additional type of primitive only requires you to write new evaluation functions. The evaluation functions for a sphere are:
//For evaluating the surface
p3d EvalP(float u, float v)
{
   float v_ang = pi*(v*2-1)/2;
   float u_ang = (u*pi*2);

   p3d ret;
   ret.x = sin(u_ang)*cos(v_ang);
   ret.y = sin(v_ang);
   ret.z = cos(u_ang)*cos(v_ang);

   return ret * radius + position;
}

//For evaluating the normals
p3d Sphere::EvalN(float u, float v)
{
   float v_ang = pi*(v*2-1)/2;
   float u_ang = (u*pi*2);

   p3d ret;
   ret.x = sin(u_ang)*cos(v_ang);
   ret.y = sin(v_ang);
   ret.z = cos(u_ang)*cos(v_ang);
   return ret;
}
Source code
You can download the source code for this chapter here. It implements the basic bounding, splitting, and dicing steps described in this article along with a sphere primitive. You'll need SDL installed to compile it.
And that's it for part one. Part two will detail the shading and sampling steps.
 Offsite links
